- Doors
- Styles
- Model 650 - Mini Storage Door
- Model 750 - Certified Wind Load Rated Door
- Model 1000 - Pre-Assembled Industrial Door
- Model 2000 - Traditional Rolling Sheet Door
- Model 2500 - Heavy Duty Commercial Sheet Door
- Model 3100 - Corrugated Wind Load Certified Door
- Model 3652 - Nylon WindLocked Rolling Steel Door
- Model 3400 - Miami/Dade Wind Certified Door
- Fire Doors - Insulated Roll Up Fire Doors
- Security Grille - Roll Up Security Grille
- Media
- Brochures
- Help
- Live Chat
- How to Measure for your Door
- Find the Right Size Door
- Check Clearance
- Choose Color
- Frequently Asked Questions
- Door Installation Guide
- Areas We Serve
- View our Low Price Guarantee
- Roll Up Door Price Comparison
- Glossary of Terms
- Delivery Information
- Terms and Conditions
- Contact Information
- Color Match Chart
- Get a Free Quote
- View Cart (0)


Roll Up Door Installation Guide
REMEMBER: SAFETY FIRST!
Anyone who has above average mechanical skills and is able to follow detailed yet easy to read instructions, should be able to safely install sectional garage doors with extension springs or the "simple set torsion spring system". Standard torsion spring doors should always be installed by a professional. Since we have no way of knowing your skills, we recommend all overhead doors be installed by a professional.
Warning:
A rolling door is a large heavy object that moves with the help of springs under extreme tension and electric motors. Moving objects, springs under tension and electric motors can cause serious injuries or death. For your safety and the safety of others, follow these instructions.
Important safety notices:
Read the enclosed instructions carefully before attempting installation. If there are any questions about any of the procedures, do not perform the work. Instead, have a qualified door agency do the installation or repairs.
- 1. Operate the door ONLY when it is properly adjusted and free of all obstructions.
- 2. The door is constantly under EXTREME SPRING TENSION. Repairs, adjustments, installation and removal, ESPECIALLY of SPRINGS AND RELATED PARTS, are dangerous so that such work should be performed ONLY by qualified door service people.
- 3. DO NOT PERMIT children to play with the roll up door. Children could get caught between the door and the floor causing serious injury or death.
- 4. Avoid standing in the open doorway or walking through the doorway while the door is moving. One could get caught between the door and the floor causing serious injury or death.
- 5. Should the door become hard to operate or completely inoperative, it is recommended that a qualified door agency correct the problem to prevent possible injuries or door damage.
- 6. Avoid installing the door on windy days. The door could fall causing door damage or injury.
- 7. To prevent injuries due to loose components, at least monthly check all bolted connections to make sure they are secure.
- 8. To prevent injuries, never place hands or fingers between the curtain and the guides while the door is being operated.
- 9. This page is not intended to provide "take-down" instructions for existing doors. Consult your local door agency if this is required, before new doors are to be installed.
- 10. Thoroughly familiarize yourself with the construction codes in your region before initiating work.
- 11. Wear the proper protective safety gear at all times when installing, adjusting, and/or repairing doors.
- 12. Consider using a 2-person (or larger) crew for installing, adjusting and/or repairing larger doors.
- 13. To prevent injury or death due to falling, use scaffolding or mechanical lifts, rather than ladders, when installing, adjusting, and/or repairing larger doors
This guide main function is to assist the installer in correctly mounting doors with due regard for safety, operation, and sound construction practices. Reference must be made to construction codes in your area. All Roll up doors direct Doors follow the general instructions contained herein. Additional installation information for the specific door shipped is found with the packing slip and on supplementary drawings. There are also bolt and small sealed parts bags with accessory lists, describing proper application.
Preparation
Read the installation instructions thoroughly to become familiar with the names of the various components and their relation to each other. It is necessary for the installer to determine the following:
- Method of operation (push-up, hand chain, or motor operated).
- Type of jamb (wood, masonry, or steel) on which the door guides mount and the fasteners required.
- The dimensions for the opening width, opening height, headroom, and side room.
Door Material
Inspect your door for possible damage or shortage of parts. Report any shortages to your door supplier immediately, or transit related damage claims to your freight carrier.
Door Clearances
Check the roll up door opening dimensions and available clearances versus the dimensions listed on the packing slip. Be sure that the dimensions are correct for the opening you are working on, taking special note of the opening width and height. Be sure that the required clearances listed on the Dimension Tables in this manual are available prior to installation.
Check our Clearance page for more information about how much clearance is needed for each one of our roll up door models
Tools
The tools recommended for proper installation of each door will vary, but commonly used tools are:
- Electric drill with 3/8" or 1/2" chuck with nut driver bits.
- Masonry drill or impact hammer and bits.
- Chain hoist and sling for raising barrel and curtain assembly.
- Scaffolding, Mechanical Lift, and/or Ladders (ladders not recommended for larger doors).
- Hammer.
- Channel Lock Pliers.
- Center punch.
- Screwdrivers.
- Drills.
- Wrenches, vise grips, C-clamps, torque wrench, and a large pipe wrench.
- Plumb line, tape measure, chalk line, and a water level.
Step 1
Unpacking The Roll Up Door
Roll Up Doors shipped by common carrier arrive at the job site packed in cardboard. Before removing the roll up door from the packaging, inspect the roll up door and packaging for visible signs of damage. If damage is noted, file a freight claim with the freight company immediately. Remove the door from the packaging.
Important!
Do not cut tape and plastic wrap that holds the door in a roll until you are directed to do so in step 6B. Roll Up Doors Direct cannot guarantee or accept responsibility for doors that are not installed as directed. Please read and understand all instructions before beginning the installation process.
No guarantee will be given by Roll Up Doors Direct if the roll up door is not erected as instructed. For best operation, follow the instructions step by step. Please review all instructions thoroughly before starting installation.
Step 2
Check the Roll Up Door Wall Opening
- A. Check wall opening width and height and verify these measurements against size of door to be installed.
- B. Verify that jambs are plumb.
- C. Check floor and header for level.
- D. Check for adequate side clearance at jambs and clearance above and at sides of header. Check horizontal and vertical headroom requirements. See clearance charts figure 1 for minimum requirements.
- E. Verify that the guide mounting surface on the jamb is flush.
- F. Make sure all parts required for installation are with the door.
Step 3
Position Roll Up Door and Parts
- A. Make sure floor is clean in order to prevent damage to curtain.
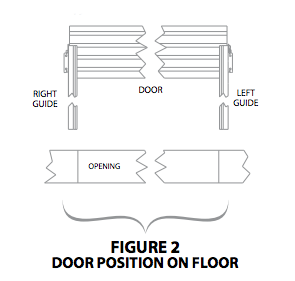
- B. On inside of building, place left guide on floor perpendicular to opening with guide bottom close to the left jamb and the top toward inside of building. Do the same with the right guide to the right jamb. See figure 2.
- C. Place door on floor at top of and between guides. Rotate door as necessary to locate bottom bar against floor. See figures 2 and 3.
- D. Distribute hardware parts to appropriate areas.
NOTE: Brackets, tensioner, spring(s) and curtain mounted latch are pre-assembled to the door at the factory. Do not remove.
Step 4
Guides to bracket Installation
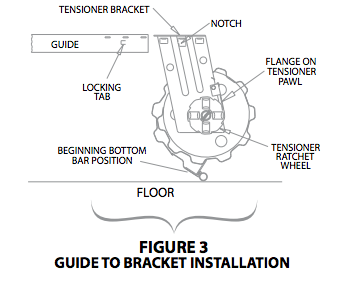
- A. At tensioner end of door, lift flange on tensioner pawl until end of the pawl clears the tensioner ratchet wheel. Rotate bracket in order to position short leg end upward. Release flange on pawl and allow end to engage with the nearest tooth on the ratchet wheel. See figure 3.
- B. Bring top end of guide in alignment with bracket and insert hooks on bracket into slots in guide.
- C. Slide bracket and guide together until locking tab in guide fully engages notch in bracket.
- D. If locking tab does not fully engage with bracket notch, use a hammer and punch to bend tab into bracket notch.
- E. Repeat steps 3B through 3D for non-tension bracket and guide. The bracket will require being held in position.
Warning
Locking tab in guide must fully engage with notch in bracket. Failure to do so may allow the door to fall during installation, which can cause serious injury or death and/or damage to door.
NOTE: For opening heights over 8'-8", clamp bottom of brackets to guides with locking pliers in order to ensure rigidity of top of guide while lifting. Remove pliers after securing brackets to jambs.

Step 5
Lifting the Roll Up Door assembly
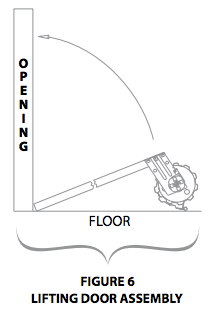
- A. Move door and guide assemblies toward wall opening with bottom of guides resting next to jambs.
- B. Lift door assembly evenly, pivoting around bottom of guides. See figure 6.
Warning
Two installers are required to lift door assembly into position against jambs. The guides are not designed to support the door weight during a one man installation. Attempting installation with only one installer can result in serious injury and/or damage to door. Do not leave door unattended until it is securely attached to jambs.
Step 6
Guide and Brackets to Jams
- A. Attach brackets and guides to jambs using fasteners shown in table 1.
- B. The guides should be mounted centered about the opening and spaced curtain width + 1" apart measured from back of guide to back of guide. See figure 7. Both guides must be plumb.
- C. The appropriate fastener must be installed at each hole location in brackets and guides. See table 1.
Table 1: Wall Fasteners included for jamb attachment of Brackets and Guides.
Item |
Jamb |
Fasteners |
Drill Size |
Brackets and Guides |
Concrete or filled block | 1/4" x 1-3/4” Powers Wedge-Bolt | Powers 01314 |
| Steel-Structural | 1/4”-14 x 1” TEKS Screw | None | |
| Steel-RollUp Frame | 1/4”-14 x 7/8” Stitch TEKS Screw | None | |
| Wood | 1/4”-10 x 1” Lag Screw | None |
Warning
Door can fall if both brackets are not securely fastened to the jambs. All fasteners attaching brackets to jambs must fit securely into a structural member or surface. If door falls, serious injury or death and/or damage to door can result.
*Note: Welding of guides to the jambs is not recommended
Step 7
Setting Initial Spring Tension
- A. Rotate door 1-1/2 revolutions in the direction that would send the bottom bar down through the guides
- B. While firmly holding the door at the bottom bar, cut the tape and plastic wrap that holds the door in a coil. Direct the bottom bar down into the guides, stopping just past the head stop area and hold securely through completion of step 7.
Warning
Extreme spring tension can cause serious injury or death. Installation, repairs and adjustments must be made by a trained rolling service door systems technician using proper tools and instructions. The Roll Up Door must be fully opened when making adjustments.
Step 8
Roll Up Door Head Stops
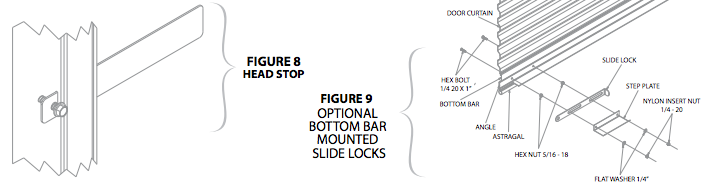
- A. Slide head stop from inside of each guide. See figure 8.
- B. Secure each head stop to guide with 1/4-20 x 1/2” thread cutting type F hex screw.
Step 9
Roll Up Door Stop Clips, Handle(s) and pull rope
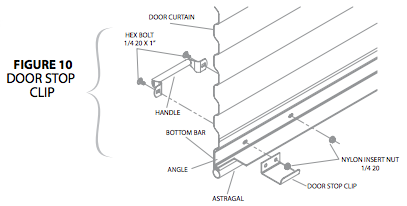 A. Install stop clip at each end on inside of bottom bar using existing single 1/4-20 x 5/8" carriage bolt and nut. See figure 10.
- B. Install handle(s) on outside of bottom bar using 1/4-20 x 5/8“ carriage bolts and nuts.
- C. Install rope in one of the holes at the center of the horizontal leg of the bottom bar angle.
Optional: Bottom bar mounted slide locks - See figure 9 for installation.
Warning
Installation of door stop clips are required. Failure to properly install clips can cause the door curtain to travel beyond the guides resulting in door damage and or personal injury
Step 10
Check Roll Up Door Operation
- A. Lower and raise the door to test the door balance.
- B. If door is easy to close, but hard to open; increase spring tension.
- C. If door is hard to close, but easy to open; decrease spring tension.
Step 11
Adjust Spring Tension
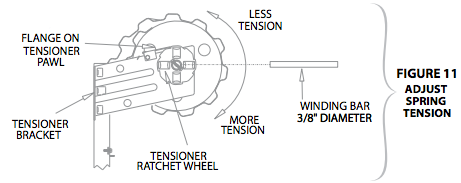
- A. Place 3/8" diameter winding bar in tensioner ratchet wheel. See figure 11.
- B. Rotate winding bar in the down direction to increase spring tension. Each engagement of a tooth equals 1/8 turn.
- C. To decrease spring tension, pull down slightly on winding bar until pawl disengages tooth. Lift flange on pawl and move winding bar up until past the pawl/tooth engagement. Allow pawl to rest on ratchet wheel and continue moving winding bar up until the pawl is fully engaged with the tooth.
- D. Remove winding bar and operate door.
- E. Repeat steps 10A through 10D as necessary.
*Note: Latch slide slot in the guide may require adjusting after door installation due to variances in manufacturing and/or site conditions.
Note: Brackets, tensioner, spring(s) and curtain mounted latch are pre-assembled to the door at the factory. Do not remove.
This video shows how easy it is to fit one of our commercial units, it should be viewed in conjunction with the installation manual.
Additional Content
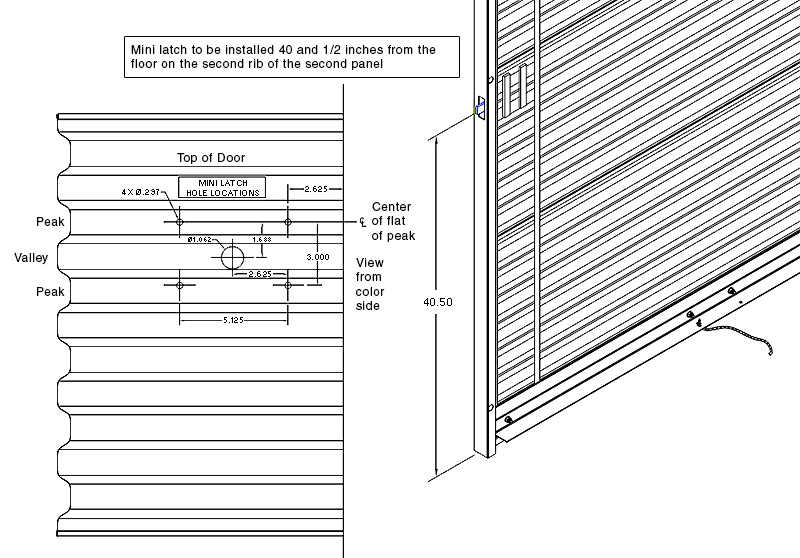
Installing a Mini Latch
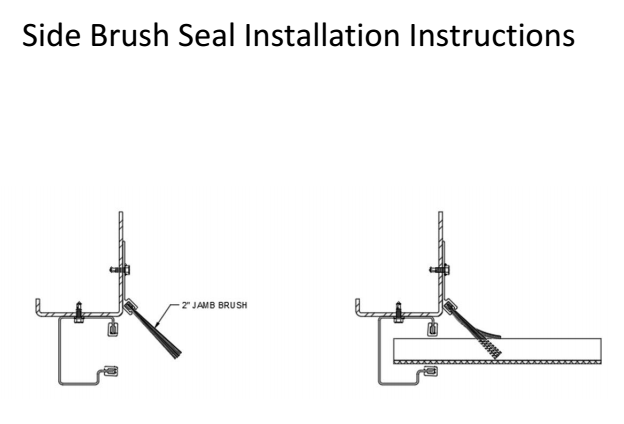
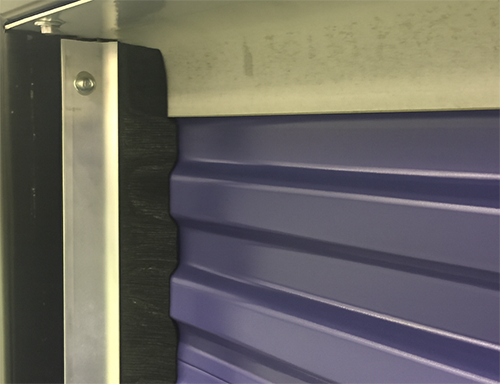
An installed side brush seal.